Like a large number of Vancouverites, Rick Havlak entered 2010 on a journey toward self-sufficiency.
It was around that time (between 2009 and 2013) that the number of municipal community garden plots were more than doubling, and dozens of rooftop gardens and urban farms were springing up across the city. Commercial property developers were turning future development sites into temporary community gardens for tax breaks with growing frequency, and everywhere you looked, parking lots were being replaced by orchards and planter boxes.
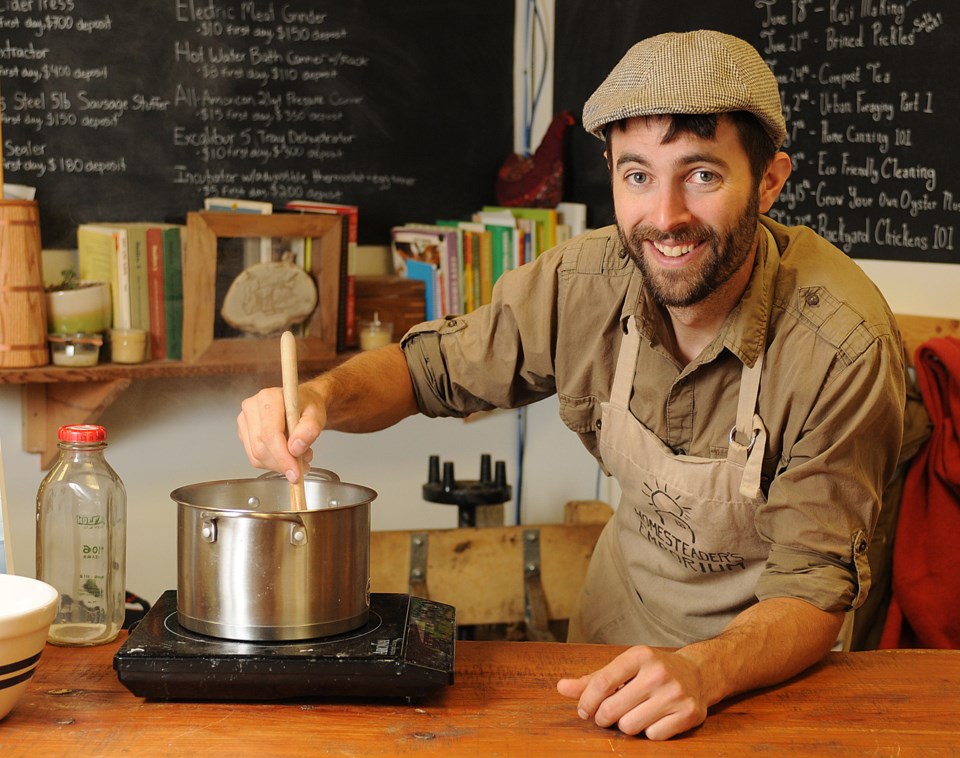
For Havlak, though, the entry point into his homesteading education was part of another, equally popular but much less prominent local trend: making beer, or, more specifically, homebrewing.
“I was big into homebrewing,” explains Havlak. “[But] the thing about homebrewing, is you have these big sacks of grain and big pots of boiling water and you boil the water and you pour it into the grain and it’s very physical… and then you sit and wait. For a long time,” he laughs.
All that waiting, in combination with the eventual rewards, led to an epiphany for Havlak.
“You end up with this thing in your hand, and it’s an example of something with which you’re intimately familiar – beer – but something you sort of almost miraculously made yourself out of nothing. And so that, in combination with all this free time, [was] very fertile ground for the imagination.”
Havlak says he started daydreaming while homebrewing about all the other projects his mom tried to interest him in – canning, making soap, making bread from scratch – that he had resisted as a kid, and before long, he and his homebrewing buddy were trying a new project a week, from building innovative beehives to making artisan cheese.
They quickly ran into the same problem most burgeoning homesteaders encounter, though:
“We just started reading on the Internet and looking through books and doing what we could to teach ourselves these things” says Havlak. “But it was problematic…because we hadn’t talked to a human being. Without a connection to people that already had a long history of making cheese or keeping bees, or – to generalize – pursuing self-sufficiency and heritage skills, we found that we were sort of lost.”
Limited materials and lack of guidance led to many frustrating false starts. Everywhere Havlak went, though, every time he talked about his experiments, the interest was there.
“We could bring it up at a party – ‘Hey, we made cheese last weekend!’ – and people loved that,” says Havlak. “Lots of people in Vancouver shared our curiosity about learning how to make things from scratch. But it was very difficult to find any kind of in-person know-how. And in many cases we had to go all the way across town looking for different ingredients, or we had to mail-order something, or in some cases we couldn’t even find that one ingredient.”
Enter Homesteader’s Emporium, the one-stop DIY shop Havlak opened in Strathcona in the summer of 2012. Inside the stylish, rural-looking store at 649 East Hastings is everything you need to pursue small-scale homesteading, from fully contained beginner kits to educational workshops with local experts and grassroots organizations.
“The common thread is making things from scratch and self-sufficiency,” explains Havlak. “You may think solar panels and biodiesel, but we’ve had to limit the scope a little bit because we’re in the city. You also won’t see goat feeders and tractors!” he laughs. “This is all designed for the urban homesteader – the person who’s sort of trying to do as much as they can in their backyard or apartment kitchen.”
That means skills like preserving, bread making, canning fresh fruit from the farmers’ market, or making soaps, salves, lotions, and candles.
“Fermentation is hot right now,” adds Havlak with a smile. “You can buy sauerkraut for $9 a jar at the farmers’ market or you can buy cabbage for 99 cents a pound and make it at home.”
There are also tools for the ickier arts of fungiculture (growing mushrooms), composting, and smoking and curing meat.
And while goat keeping might be four hooves too far, interested agrarians can walk into the store and find resources for hobby beekeeping and backyard chickens. The City of Vancouver allows both (with some restrictions) as part of its sustainable city initiative and a schedule of expert-led workshops on how to safely and ethically embark on those homesteading adventures can be found here.
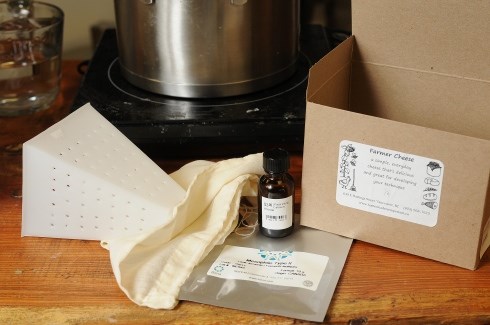
Make your own paneer
Paneer is often the first cheese people make because it's easy and requires no special ingredients. If paneer is the only cheese you ever make in your life, you can still truthfully tell your friends, coworkers, lovers, prospective lovers, and anyone who will listen that you are a cheese maker.
We use the term “paneer” (also written “panir”) because it's widely recognized due to its appearance on Indian restaurant menus, but many culinary traditions have an equivalent. “Queso blanco” (literally, “white cheese”) is the Latin American version.
The Big Picture: we're going to heat up some milk to boiling, add enough vinegar to curdle it, then strain and press the curds. That's it!
Ingredients
|
1/4 cup vinegar for your first batch 2L of the best milk you can find (or afford) |
|
Handy Items
|
Stainless steel pot that comfortably holds 2L milk A mesh skimmer or curd ladle (if available) A rimmed baking sheet or plate A colander extra vinegar (any kind) Something in your kitchen that weighs about a pound |
|
Instructions
1. Heat your milk slowly until it's just at the point of boiling. If it actually boils it's OK, but you may risk it boiling over. A bigger concern is scorching on the bottom – give it a stir occasionally to make sure milk isn't sticking to the bottom, and if it is turn the heat down.
2. When the milk boils or you perceive that it's about to boil, turn off the burner and remove the pot from the heat.
3. Pour the prescribed amount of vinegar over the milk. For 2L of milk, about 1/4 cup (the amount provided) is enough. Stir the milk gently just enough to mix the vinegar in. 5-10 seconds is plenty.
4. Wait a few minutes while the milk curdles before your eyes. The yellow liquid is whey, and the white curds are the solids (protein and fat) that were present in the milk. When the whey is transparent yellow and quite distinct from the white solids, you're ready for the next step. If it takes more than 10 minutes, add another tablespoon of vinegar.
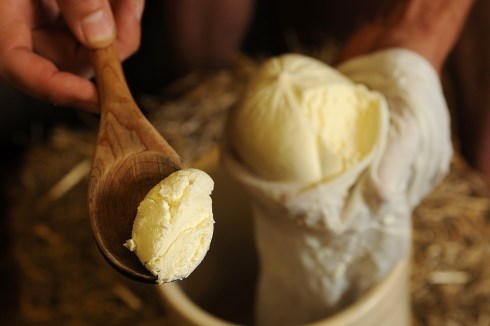
5. Spread the cheesecloth in your colander and place it in the sink. Gently scoop the curd from the pot and place it in the waiting cheesecloth. The more gentle you can be at this stage, the better your final cheese will be. If your curd is too broken up in the pot to scoop efficiently, you can carefully pour the whey through the cheesecloth, but view this as a last resort as it will take much longer to drain.
6. Let the cheese curd drain in the colander until whey is only leaving at an infrequent drip. This may take a few minutes to nearly an hour, depending on how gentle you were able to be in transferring the curd.
7. Place your cheese mould on a rimmed baking sheet or plate. Lift the cheesecloth by the corners out of the colander and ease it – cheese and all – into your cheese mould. Fold the corners of the cheesecloth over the cheese (yes, it's cheese now!)
8. Put your one-pound weight (a jar or glass of water, a mortar from a mortar and pestle, or whatever you have on hand) on top of the wrapped-up cheese.
9. For softer cheese, leave it for 15 minutes like this. For firmer cheese, leave the weight in place for 8-12 hours. You'll want to put the whole assembly into your refrigerator if that's the case.
10. However long you press it, unwrap it and admire the cheese you made! Eat it within a day, or sprinkle it with 1/2 to 1 tsp of salt and refrigerate in a sealed container for up to a week.

Larger batches
This particular cheese scales well. That means if you're throwing a party, you can double or quadruple the recipe, usually without any adjustments or problems. We suggest you keep a little extra vinegar on hand in case you need it to help the curdling along.
Going Further
As mentioned, this is one of the easiest types of cheese to make. If you're curious to make more cheese like quark, mozzarella, camember or feta, visit Homesteader's Emporium or take one of their cheese workshops.